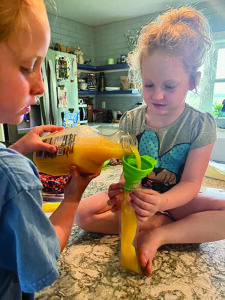
Making homemade frozen treats can be turned into a healthy and hydrating refreshment by using your own selected ingredients. (Photo by Leslie Milby)
Does the ice cream truck rarely make it down your street? Fret not, pick up a set of inexpensive popsicle molds and get busy making your own treats — without the annoying music.
With summer approaching, making popsicles can check a few things off the summer bucket list. First, of course, they are both tasty and refreshing in the heat.
After a successful batch or two, you’ll all be wondering what other combinations you can come up with and the creativity — and maybe even competitiveness — will kick in.
They are a low mess project and do not even require heating up the kitchen with having to bake.
They can also be turned into a healthy and hydrating refreshment by using your own selected ingredients.
The dyes and artificial flavors can be replaced with fruits and even veggies to mimic the more expensive brands at the store.
Plus, no more dying yellow popsicles or other non-favorite flavors being left to icicle in your freezer– make only the flavors that you love!
Molds are often found for under $5 and are both fairly basic as far as design style as well as foolproof so there’s not much research needed there!
The hard plastic type you’ll cup your hand around to slide out your pops and are easy to wash, whereas silicone molds you can fold down to release and some can have more detailed shapes. Either will work just fine.
For both types, the most important key to success is simply paying attention to the fill line.
Overfilling them will make them not only a mess when you go to push down the tops, but it will also make them freeze around the top and difficult to pop out.
Conversely, if you are overly cautious and don’t fill them enough, they won’t adhere to the stick well.
Keep in mind that most sets come with only four to six spots per mold so when mixing together ingredients, you likely won’t need much more than a small bowl of your concoction.
As for ingredients, whether you like a fruity or creamy or decadent, the combinations of bases and flavors are endless.
For a purely fruit flavor, puree the fruit and for a “smoother” taste, try a complimentary juice.
For example, pureed peaches can pair nicely with orange juice, or strawberries could even be mixed in with a daiquiri mix.
Bananas also make a great thickener and complement many fruits.
To create a fancier look with a twist of flavor, try adding in small chunks of kiwi, strawberries, mango and other seasonal fruits.
Adding in fruit on its last day or two or juice that everyone’s lost interest in is a good way to prevent food waste.
If younger children will be enjoying, choose to puree the fruit so there are not any unexpected chunks.
Deepen the fruity profile by using jello powder made to directions on the box and pouring it into your molds.
The jello can also be enriched with a few real fruit chunks thrown in.
If you are looking to add some creaminess in, try greek yogurt or coconut milk pureed with the fruit.
Have more of a sweet tooth than fruity? Mix equal parts milk and whipped cream and stir in candy and cookies. (Ice cream also works with one of its favorite buddies — root beer.)
If you are in the mood to make popsicles but don’t have a mold on hand, you can also use 3 ounce paper cups with a popsicle stick.
To make the sticks stand up, fill the cups and place them into a pan with high walls.
Then stretch saran wrap tightly over the top and stick in the popsicle sticks into the cups.
After they freeze, simply peel off the cups. If you do have molds but want to keep more popsicles on hand, use the molds with wooden popsicle sticks and place the pops in a bag so you can keep refilling the molds.
For the easiest popsicle of all, take individual pudding or jello cups like you would pack in a lunchbox and simply stick a popsicle stick through the lid.
After they’ve frozen, peel the lid and pop them out.
The chocolate pudding tastes just like a Fudgesicle.
If you spend half of your summer snipping of free-z pops, purchasing sleeves might be a good strategy for your family and are easier still than popsicles.
You can purchase a pack of 160 sleeves for typically around $10. They are non-reusable, so while you could buy free-z pops pre-made for cheaper, making your own is certainly healthier and tastier.
The long and skinny sleeves are also great for tucking into coolers for a long day on the go in the heat.
The sleeves are easy to fill using a funnel which is most often included.
Simply pour any liquid in to create the perfect flavor. Keep it as simple as pouring your favorite juice such as lemonade, orange or other fruit juice to the fill line.
If you’d like to add fruit chunks such as diced strawberries or blueberries, pop them in first before pouring your liquid.
Again, it is important to watch the fill line so you can snip off the top.
As temperatures heat up, get busy getting creative with your own frozen treats that on a hot summer day, you might even let pass as a summer breakfast.