
Time for a cabinet refresh?
 Sometimes while standing in your kitchen whipping up your famous Hamburger Helper recipe, you start to look around at those dark cabinets. Or those white cabinets. And somewhere between allowing the mixture to simmer, covered, for 10-12 minutes, you get the idea to paint your cabinets.
If you ever needed an enabler to take the leap on doing a kitchen painting project, it’s Roberta Burke of Eastern Shore Chic.
Perhaps you’ve taken your unsuspecting husband’s truck to haul home one of her knock-out gorgeous custom painted pieces, or have sent her a desperate Facebook message when your paint project goes awry. She’s the girl.
Burke was hosting a class on repurposing old cabinet doors to make chalkboards and found her students asking about actually painting real cabinets instead and so her next class, DIY Paint Your Own Cabinets, was formed, was a success, and is being repeated.
It makes sense. A husband or other confused person would go, “But your cabinets work fine, there’s no need to change them.” And that’s somewhat right: If your cabinets are the right size and are still sturdy, it may not be time to spend thousands on new ones for a refresh.
As it is, 8 million tons of furniture end up in landfills annually so a paint pick-me-up is a great solution.
Prep Work
The first step is both the hardest and the most fun: Selecting a color. Many people have a goal of going lighter from darker cabinets so of course the most popular shades are whites and creams, and in Burke’s case, “Dropcloth,” an antique white is her most popular for cabinets.
But also rising in popularity thanks to HGTV and Pinterest are actual colors — blues, turquoises, and other eye catching shades that make practical cabinets stand out.
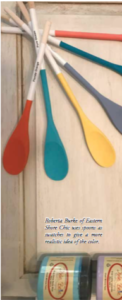
Burke, who is the regional salesperson for Chalk and Mineral Based “Dixie Belle Paint,” can offer tons of color options with a shuffle of her painted wooden spoons as skews, and bland ain’t one of them.
Try a sample and give it a swipe across a cabinet on multiple walls or areas if some are more exposed to windows or darkness more than others. Is it still color love for you? Great! Like it on one spot but not the other? Do one color on uppers and a darker color on the lowers for a contrasting look.
Now it’s time to get to (actual) work. As you take off your doors and remove any hardware be sure to label where they go and keep things together- painter’s tape works well for this.
When the painting is done and you’re racing toward the finish line you won’t want to be building a puzzle.
Some folks say to leave the hinges on the doors and cover with tape, but trying to paint around them is tricky and will slow you down.
You’ll also want to take a putty knife and pop off the little rubber bumpers on the inside of the cabinets.
Luckily, unless you’ve really got your cabinets over flowing, you won’t need to empty them out entirely.
You won’t be painting the inside of your cabinets so as long as you are somewhat careful you should be fine, but you will want to cover your stove and countertops with a dropcloth or thick paper so you don’t get paint on those. ( Those are not a cheapie upgrade!)
For the most part, this cabinet remodel will be inexpensive so live a little and buy high quality paint brushes because the last thing you want is to be trying to constantly pick stray bristles out of your project.
Find a nice at area to lay your doors. Outside you risk a fly landing on your paint, but in an overly hot garage, you may have issues with the paint going on smooth.
Ideally, you’ll be able to set your doors up on something such as a sawhorse or buckets, free from children both furry and otherwise.
While it is a relatively simple project, it can be a little time consuming if you have any kind of life.
Consider ways to break it up if you can’t devote enough time to do the entire thing all at once. Do the uppers one weekend and the lowers another, or one wall one time and the other wall when you get more time,
Paint
And finally, get to painting!
Chalk and Mineral based paints, such as Dixie Belle, have little paint prep work for great results and in most cases you won’t need to sand or use a standard primer.
You will want to start with a clean surface.
Select a product to de-grime and strip oils in the wood so paint has a good surface to stick to.
If you have darker cabinets or ones that are musty, smoky, etc, use a stain- and odor-blocking primer to give your cabinets a truly fresh start. If not using a mineral chalk based paint, cabinets with a dominant wood grain are good candidates for a coat or two of primer if you don’t want it to show through.
From there, it doesn’t matter if you choose to tackle the shell or the doors first. Alternate and allow the other to completely dry before doing a second coat.
Check with paint supplier as you may want to add a bit of water to your second coat, which helps it to glide on without altering the color. Plus, you won’t be using as much paint!
With self leveling paint, so any brush strokes will disappear as the paint dries but if there is an imperfection or two, simply sand any rough spots with a fine grit sandpaper to make it silky smooth.
The next step is for a clear coat to be added, especially around the oven and splatter and spill areas. If you have children, I recommend clear coating your entire house. There are several glazes to choose from too.
Burke recommends the Gator Hide because as the name implies, it’s tough like a gator and water repellent (and pays homage to Dixie Belle Paint’s Florida roots).
To add rustic air to your doors, there’s a whole line of glazes including “grunge,” which gives that worn in look to your cabinets.
Don’t even bother explaining this to your husband, he’ll never understand the decoratively distressed concept!
Swipe into corners and blend outwards where grunge typically settles to give your cabinets that rustic chic feel, then wipe with a damp cloth.
Doing this after your clear coat will help your glaze be a little more forgiving. A great step by step video is posted on the Eastern Shore Chic Facebook page.
Left with no clear coat and unglazed though, a painted cabinet can be turned into a chalkboard so if there is a cabinet left out of the line of fire (literally), try leaving it unglazed for kids to doodle on or a grocery list space.
Allow paint to dry and reinstall your doors. “Ooo and Ahh” over your hard work, but close those doors gently! Paint can take a few weeks to fully cure so easy does it!
It’s Just Paint
Besides her expertise, the other thing that makes Burke a great enabler is her attitude. From raising a special needs grandson to her husband’s cancer battle a few years ago, her custom furniture and paint business was formed as a way to put food on the table and use her knack of piecing together a home with refurbished hand me downs.
These days, she’s still piecing together her home as customers will buy the table out from under her TV as despite her growth, she runs Eastern Shore chic from her home.
Her lighthearted husband Bob doubles as her jokingly disgruntled employee, standing back when his wife is on a roll and fetching things when he is summoned to, while grandson Tyler loves showing off distressing techniques.
Though custom painted furniture and cabinetry is the bulk of her business, she finds that many people like to take on a project themselves and she loves to furnish the paint along with tips and tricks.
Some of her most popular customers are teachers- she says she sees a boom in paint sales as soon as school is out for the summer!
She is also tied in closely with a network of fellow creatives and small business owners, some of who do go the brick and mortar route where she can use space for classes such as her cabinet painting or “Mermaids and Margaritas,” held at nearby Little Dreamers Wellness Center in Berlin.
Burke says, in the scheme of things, “It’s only paint. Really, what’s the worst that can happen?!?”
Her next cabinet painting workshop is scheduled for Aug. 10.
Next time you’re waiting for that water boil, take a look around your kitchen and get your imagination going!


